Monday, July 24, 2006

EASY Personalized Embossing – without a stamp!


Have you ever wanted to say something on a scrapbook page or card…and you didn’t have the rubber stamp to do it? Now you can personalize almost anything and use your embossing powder to give it that professional looking raised effect.

The secret?
An erasable ball point pen.

Why does this work?
The ink in erasable pens is meant to stay wet longer…so you can erase it. It stays wet just long enough to get the embossing powder to stick. So, anywhere you can write with the pen, you can emboss.


SUPPLIES:
Scrap cardstock, card or whatever you wish to emboss
Embossing powder (solids or opaques work best for this technique)
Embossing/Heat Gun
1 Erasable ink pen ( I like Papermate “Eraser*Mate”)

DIRECTIONS:
Make sure your cardstock is free of fingerprints (the powder will stick to them).
Write whatever you wish on the paper with your erasable pen.
Sprinkle a liberal amount of embossing powder onto the cardstock.
Shake off excess and put leftover powder back into jar.
Use Embossing/Heat Gun to “emboss” the image.
VIOLA! You have a personalized image or your own handwriting embossed.


SOME IDEAS:
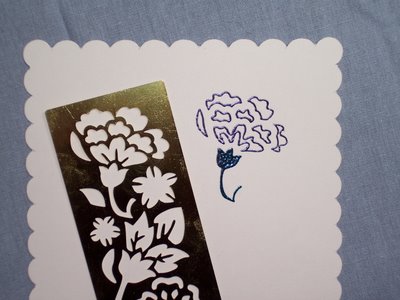
Use a stencil to trace a shape.
Use more that one color of embossing powder.
Doodle over an existing background print or image to make it more noticeable.

Write your own jokes on personal cards.
Personalize any cheap card you find.
Make great embellishments for your scrapbook page.

Create swirls or decoration on plain painted chipboard pieces.
Decorate a photo frame.
Update a boring sticker.
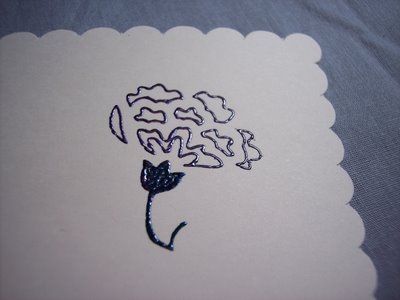
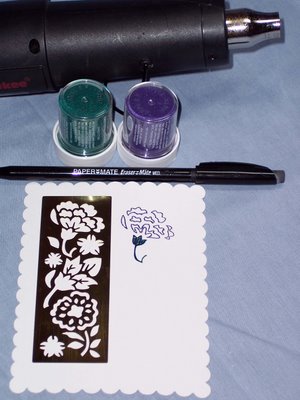
SAMPLE:
Here is one I did using a stencil and two colors of embossing powder. I also colored in the bottom stem of the flower and left the petals outlined.


Play. Doodle. Have Fun!


Thursday, July 20, 2006

Zero Gravity Scanning - You gotta Try this!


Have you picked the Premier issue of this new magazine yet?

It is chock full of good ideas and step-by-step projects with tons of color photos.

They have a
  • FREE PROJECT
  • available online.

    But one of my favorite articles was the "Zero Gravity Scanning" how to.

    My brain is already spinning with new ideas. I don't know why I never thought of this!!

    You basically take the lid off of your scanner, flip it upside down onto anything you want to scan.

    This is great for those 3D items and the large items. Make sure you place a clear transparency sheet over your scanner's glass to protect it. This is fabulous when you are trying layer a collage like scene -- this way you don't have to try to do it in reverse and *hope* that everything is lined up the way you want it.

    The article suggested even creating dimesional scans - a landscape in an acrylic tray - (I call them "scanscapes" ). Fill a 1 inch deep tray with sand and shells and ???, place the scanner upside down on top and scan! Make your own background pages - shadow box style.

    So many ideas...

    I cannot legally post the actual scans of the article, but trust me, that isn't the only good project/technique in this mag. You WILL want to get a copy of your own to save on your reference shelf.


    Inkjet Transfers ~ that don't require a photocopy or laser print to work!


    These were my 2 color images.


    This was my black and white image


    This is the paper I used


    This was the water mister bottle I used


    This was the result on some tafeta like fabric


    The trick is the Brand of paper is very specific!

    I originally got the idea and instructions from Nina Bagley


    SUPPLIES:

    Walmart JetPrint Photo Paper - GLOSSY (it must be a type of glossy photo paper by JetPrint)
    Water in fine mister bottle (the finer, the better).
    Image to print. this can be color, sepia or black and white.
    Piece of paper, fabric or ? to transfer the image on to.


    DIRECTIONS:

    1. First Choose an image (or more than one ;-) and print it out on the JetPrint Photo Glossy Everyday Photo Paper. (Remember to print the image in reverse if there is any text or it will be backwards when it is transfered.)

    2. Lay the printed image face-up. Spritz generously with a fine mist of water.

    3. Flip the misted image face-down, onto the desired area of you paper/fabric that you wish to transfer to.

    4. Burnish the back of the image down with the back of a spoon, or a paper towel.

    5. Remove the photo paper and let dry, or use heat gun.


    NOTES:

    Other Glossy photo papers may or may not work in this same method. I just know this seems to work with many people using different inkjet printers around the world.

    You may use a soft foam brush to apply the water instead of a mister bottle. This is just what worked well for me. Vary the amount of water for different effects.

    This method may or may not also work on wood and cork as they are both porous. Try it. Play with it. :-)

    deanna


    Techniques are coming...hang on

    I will work more on this tomorrow...I am exausted today.

    Thank you for your patience.

    Well...*H*E*L*L*O*


    Hi there. I guess I have been bitten by the "blog bug".

    I keep finding good deals and want to tell people about them, but you are so limited to what you can post on most sites and forums. I wanted to be able to post any link to any site or photo.

    I am a crafter, mostly a paper crafter. If it can be made with paper, I want to know about it. I am just getting into digital scrapping and it's addicting. I can’t wait to be able to make my own kits!

    I love vintage and new. I like shabby and grunge, but not cutesy. All colors are fair game. I get bored easy and find new interests and techniques all of the time. Some of my constant interests include:
    Photography
    Altered Books
    Collage
    Book Making
    Paper Making
    Paper Collecting
    Rubber Stamping
    Metalsmithing
    Jewelry Making
    Scrapbooking (paper and digi)
    Travel (although I don’t get to do as much as I'd like)
    Garage/Estate Sales, Flea Marketing and Antique shows
    And … the antics of my kitties.

    Feel free to leave a comment…especially if you know about a good deal!